Showing posts with label Home Projects. Show all posts

Tuesday, January 18, 2022

Reading Books And Keeping A Good Home Library...


 Cleaning Out My Bookcase

This may sound silly, but I just needed to remove all the books that were
No longer easy read or easy to process for me.
I have always enjoyed a challenging book or one to truly study.
Not so much any more;
I also don't want to just read to coddle my brain;
Brainless nonsense,
But the ones that hold my interest and are able to pronounce the words.
(Smiles)

I don't want to think about things that have been truly settled in my heart.
And so many books are challenging the old ways,
I no longer desire to go to seminary (really never did)
Homeschooling seminary LOL

We all need to keep our minds active, but not overload!

I had to study before each ladies' class;
And even for children's Sunday school class.

But in this season of life, 
I get to study Scripture for the pure joy of it!

So, I took my time and went through one of my bookcases,
And took all the heavy theology books out.
And I am donating them to a Pastor friend and his congregation.

I also have been looking into classic homemaking books,
Books on ways to improve my home.

I must confess I have tubs and tubs of books in my garage;
And the plan is to go through those also!
So I do have my Book Work cut out for me LOL

I do hope we all try to keep a good Home Library;
As I resource you can hold in your hand is still the best!

Google might be easy, but it feels like it's missing something.
I think cleaning out either a bookcase or a closet or drawer,
Is A Good Thing...

Book Smarts
Blessings, Roxy


Wednesday, April 1, 2020

How To Make Home Your Haven...


Home Life, Living from Glory To Glory Blog...

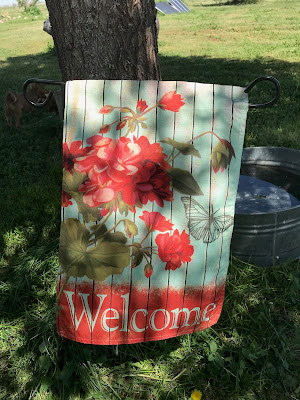
~WELCOME~

The Days Are just Flying By...
The month's are also,
As we all know this year is looking much different than anything,
We have ever seen in my lifetime.

But, once again we must rise to the challenges life bring are way.
Make this a positive experience as much as you can!
This country has seen so many things that attempting to knock us down,
Or to destroy us!
But we keep plodding on, and pray and to place one foot in front of the other!

You all know you can only deal with what comes next!
One day at a time for everyone!

Just do something...
Keep your heart calm and keep your hands busy!

Started my Spring cleaning!

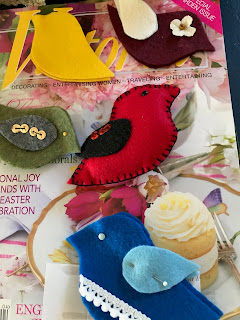
Working on some hand sewing, making some more felt birds;
I will be hanging these on my indoor woodland tree!
I think it will make a nice spring\summer look for my tree.

"Here are a few of my felt birds I am sewing"
Felt Birds, Living From Glory To Glory Blog...


I have been making the very use of my time with being at Home!

Just maybe we will have an awakening of the love of home...

We have become such transient people, no one enjoys their homes!

But, if you are a person who enjoys the comforts
 That only home can provide.
It is a blessing.
I never wanted to wander far from my home or loved ones!

We must learn how to make our Homes A Haven...
As we are all in need of a safe harbor.

Maybe this will become a turn in the event,
 That we will realize that good, hard work is a gift!
Maybe we will not be so ungrateful for the abundance we have access to.

Start working in your yard, make your area pretty!
We can all do something productive!

Remind yourself and those we love;
We will overcome!

Blessings, Roxy

Wednesday, May 3, 2017

How To Do Your Own Kitchen Chair Makeover...


Do It Yourself Kitchen Chair Makeover, Living from glory to glory blog...

How To Recover Your Kitchen Chairs..
A Frugal Idea and a nice makeover!
It made the whole kitchen just pop!

Here is what my old kitchen chair coverings looked like!

They were really very nice when they were brand new.
They were covered in a plush suede material.
But when you have a chair covered in a solid color it shows
Every stain and all the dirty marks.
Spilled foods and grease spots.

I remember one summer day someone came in with their wet swim shorts on,
Yes, I had permanent seat marks on that chair.

These chairs were good quality and the wood was still in very nice shape.
I have six chairs with this kitchen table set.

So I decided I would recover them!

Firstly, measure each chair top, then add a few inches to each 
chair, as it is wise to have extra material.
(If you are not sure of how much material to buy,
Get the measurements and find someone who can help you
 purchase the right amount of fabric)

I chose a very bold material with a pattern that would help hide future stains!

Supplies Needed 

You will need a staple gun!

Also a can Of a good Scotch Guard product!

Cut each chair size accordingly!

Place over each chair and pull tightly, staple them down on the underside!

Take each seat cushion and spray with scotch guard!

My whole family helped me one evening to take off the old material,
And we cut each size of fabric to fit each chair.
I wiped down and waxed each chair.
Then we covered and stapled on the new fabric coverings.
Then we took them outside and we sprayed them with a
Fabric Scoth Guard Spray!

To add an extra barrier of protection!


(Here are the results and the fabric I chose)
My Kitchen Chair Makeover... Living From Glory To Glory Blog


I also did another real different thing, as I said I had six chairs. So I covered four of them in the bold, bright paisley color. And I covered two of the chairs in a soft golden beige with a very nice pattern. The two patterns look really nice together. Not a perfect match, but they compliment each other. I use the two chairs in my living room. One is used at my study desk!


Hope You Enjoyed My Kitchen Chair Makeover!

What projects have you done lately?
I hope this inspires some of you!
Sometimes just a little fabric and some paint can
make the biggest difference to any room!

Home is where the HEART is...

Blessings, Living From Glory To Glory

Hugs, Roxy

Sunday, February 26, 2017

Enjoying Having Chickens On The Homestead & Mc Murray Hatchery Company...

Mc Murray Hatchery, Living from glory to glory blog

Having Chickens

I truly think chicken's are the very prettiest when it is this time of year!
They are very fat and they have all their feathers!

I have had the pleasure of having chickens for years!
I love getting fresh eggs!!
During the long winter months they stop laying completely for a few months.
But as soon as it starts to warm up they start blessing us again!

I do not let them free range very often because they really are
very destructive!

They also will start laying their eggs in spots that you may never find them!

Also, we have foxes and coyotes that would love a chicken dinner!
Plus we have three dogs and I feel that it is such a great temptation for them!

I usually get a new batch of baby chicks about every two years;
Then I can keep a newer, younger hen in the flock.
But I have some very old hens that are just plain fat and I am sure they don't
Lay eggs anymore. But they are like the old girls in the flock.
Just because they are old I still love having them!
They are just fat and fluffy!
I have had a few that are really mean!
Those ones don't stay around very long
(Can't trust them with the grandkids)

One thing that I have enjoyed about having chickens other than
getting fresh eggs, is that they will eat all the left over
scrapes of food and anything past the safe date to serve
the family. Also, any peelings and sour milk they love!
Then I don't feel bad that something has gone bad;
I just feed it to the chickens!!

We have two roosters and it gives just enough competition for the top rooster!

My plan is to order some new chicks real soon!
I order from a company called

MCMURRAY HATCHERY DOT COM


I have a small special box I keep in the barn with a heating lamp!
I keep them there till they can't fit through the holes in the chicken wire.
And they hop around like a jackrabbit!


Homesteading And Chickens, living From Glory To Glory Blog...

Do you have some funny memories of chickens?
Actually, many people are afraid of chickens!

Blessings,
 Do not give up hope Spring is a coming...

Tuesday, August 9, 2016

How To Use Old Useless Stuff To Create A Charming Yard...


There is just something so charming about old vintage bicycles.

Days of summer fun and places to explore!
A mode of transportation to school or a friend's house.

I wish we had kept all those old bicycles from our childhood days!
Or maybe of the ones we had of our older brother and sisters.

I think these old charmers are getting harder and harder to find.
This little beauty is in my sisters garden area;
She has a huge flower garden and it just adds an ambiance to the natural landscape!

I have tried many different items in my flower gardens to add charm!
Old metal tubs and vintage plates places in the soil sticking half way up.
Old cowboy boots and old boxes and planters!

I truly love finding old wheelbarrows and placing them around our estate.

We use to even place old bottles and cans in some of the smaller dry beds!

Learning to use an imagination and decorating outside of the box!

After the end of our summer season, I gather most of the items and
we store them in an old log cabin out back.
It stops some of the fading and wear during the long winter.
Then when spring comes again we pull everything out and place it in all the
different spots to add color and interesting schemes.

We have a lot of the old metal chairs and we have painted most of them all red!

I think having a lovely yard and some unique decorating pieces is fun!

Everything takes work and time!
But if we keep our eyes open while at goodwill or garage sales;
You can find some great treasure for yard decorations!

Just remember to keep your yards clean and filled with garden charm!

Sweep of your sidewalks and fill planters with flowers!

Outside work can help keep you fit and a bit strength building!

This is such a easy way to make your home look inviting and charming!
Pick a couple of colors that match your outside scheme;
Then paint fences or tins or planters to match;
Doing it now is a good time to get a jump start on it!

Make it fun and ask others to keep and eye out for what you're looking for!

I have used broken off shovels and pitchforks, they really look nice!

I have gone down to the river bottom and brought home
old stumps and large limbs that are weathered and look wonderful!

Even a large rock placed in the right place looks good!

My kids when they were young or may still say it now (smiles)
What the heck are you going to do with that old thing MOTHER...

I have many old farm implements and have spray painted some of them bright red.

Country, cozy and cheap and so filled with charm!


Old birdhouses and birdbaths are lovely!


Any type of fencing can look vintage and charming...
Paint it or stain it!

Plant seeds every spring as you never know what might just take off!
Remember to try to plant a few new bulbs each fall!

I believe we can take what God has given us and make it a little slice of Eden...

Small yard or extra large you can make it pretty and lovely!


Friday, July 3, 2015

Red, White And Blue, These Colors Do Not Run...

 
Living From Glory To Glory Blog,  Country Living


Country Red, White And Blue...
These colors don't run.
 They  stand up under duress!
Wear and tear and blistering sun...
These Things Will
Keep you on your toes and teaches us to keep a good sturdy pair of boots on!

I am learning to be a lady even in rough conditions;
Hail, Heat, Gully Washers!
This is the first year I have not killed at least a few rattlers....
(Thank You God)

I painted our bird feeder out front this morning.
I painted our old metal swing set also.
I started scraping the old paint of my clothes line.
I am painting all these things my country Red Color!

Yesterday, after cleaning all my cupboards out, of all the foods that,
Had now turned limp from the humidity, I thought I would go out and
Take a little rest in the kids hammock next doors tied up between two trees.
I kid you not;
 I got into that thing and it just spun around and threw me to the ground!
I could not believe it;
I said aloud....

SERIOUSLY


So last night required two aspirins and some wintergreen oil on my shoulder.
I awoke feeling like I had ridden a Wild Bronco!
But no, I was just dumped out of a hammock right onto my backside.

SERIOUSLY

This is how I imagined it was going to go!


A girl needs to look like a lady
Dress like a lady
Talk like a lady
But work like she can get a job done...
I am not a wimp, I enjoy getting my house painted and clean!
Sometimes it does require work gloves, work clothing and boots!!

My husband is always so amazed that I am willing to jump in!
Trim trees, paint, pull weeds...
Whatever it takes to help alleviate some of the work and burden!

I believe God has made women very strong and a bit of grit...

We have helped this country by working alongside our men!
Yes, I firstly keep our home running smoothly and something to eat!
But there are times that we just need to help get the extra stuff done!

I have never been afraid of hard work!

This country has always been under attack from either,
The enemy or a wicked person or a natural disaster!
War or a downturn in something!

But we are told to look to the hills where our help comes from!
May you all have a wonderful life!
God Bless America...
God Bless America


SERIOUSLY...


Monday, May 4, 2015

How To Make A Ironing Board Cover...


Living From Glory To Glory Blog

How To Sew Your Own Ironing Board Cover...

Making a new ironing board cover can be really a great idea;

My Reasons for wanting to make one myself;
I wanted a certain fabric to match my new sewing room that had pink in it
and has a vintage look to it.
 And as we know most fabrics used in ironing board covers are so modern looking.
I must admit I was a bit intimidated over the idea,

Firstly, may I suggest using the old cover as a pattern.
Measure how much length of material will be needed to cover your board
All ironing boards are not the same size or width!

Purchase a fabric that you love in color and design
Make sure it has a sturdy feel to it and will wear the use well.

Buy two packages of single bias tape to use for the draw string.
Purchase a color that matches your fabric

Purchase one package of Velcro Tape.
This will be put on the underside of the cover to keep it in place;
While on your ironing board.

Buy enough draw string cord to go completely around the cover,
Once again measure from your old cover for the length needed!
But buy at lease 12 inches longer to tie a good knot or bow,
And to assure not running short of the amount needed!
(You can buy all these things from the fabric store)

And of course you will need thread and a good pair of scissors!

Now lay out your fabric and lay the old ironing cover on top;
Measure twice, then start cutting around it and leave at least two inches extra!
Now lay this fabric on your board to check to see if it will be too large;
Or just right, that is why we add a bit extra.

Now, Add your bias tape,
Slowly start pinning it to the fabric, starting at the bottom flat edge of cover;
You will be leaving a small opening to add your draw string!
Once again refer to your old ironing board cover.
Pin the bias tape completely in place first!
Remember to keep the tape even so your draw string will go through it!
Have your pins facing into the cover so as you sew, you can remove them.
Start sewing from the flat bottom (remember to leave your space)
Go completely around the cover!
Remember to back stitch when you start and finish to reenforce your stitches!

Living from Glory to Glory Blog


To add the draw string, use a safety pin and tie one end of string to it;
Then start pulling it through the bias tape that is sewn on your fabric.
Once it is all pulled through, make sure the other end does not come out.


Now lay this over your ironing board, start allowing it to contour to the board.
Pull it gently to you get a nice fit!


Then, once I make sure all fits well, Now, I sew into the backsides some
Velcro tape to keep it in place and it does not slip or move around!
I place the Velcro  tape in about three places, but two places might be sufficient.


When I had my sewing room painted our son put in an ironing board unit 
right into the wall for me. And because of its smaller size I was needed
A cover that would fit properly, but also I wanted a pretty one!
These Hide A Boards are really nice...

So because of this unique size needed it inspired me to make my own!
I am really glad I did as it was a fun and not really that hard!

I always leave the old cover and padding on as I like the extra padding
it adds to the board. So I just place the new cover over the older one!

TA- DA 
 A new ironing board cover!

A few years back, I purchased from Etsy a new ironing board cover for myself 
 and I loved it as it was a fabric that had roses on it!
So I guess it won't be long and I will be making a new one for that board also!

I enjoy ironing and find it quite relaxing;
Also, I use it while crafting as a table for my items!

A good quality ironing board is a wise investment, just like a good pair of scissors!
My kids knew not to touch my good scissors (smile)

Hope you enjoyed seeing how I made mine;
Sometimes we need to try our hand at something different!

Also, I think this would make a nice item for stay at home Moms to make and sell!

Blessings, Roxy

Wednesday, March 26, 2014

My Pink Room...


 I have been so enjoying my new pink room!

It has been such a blessing in so many ways, such as;
 To have a room that I can keep my sewing machine up all the time!
 It makes it so much easier to keep a project going.

And to keep my ironing board up all the time also,
as you all know by now how much I enjoy ironing!

My family bought me this beautiful old desk for Mother's Day
A few years ago from an antique store that I now use
 for my sewing table. It is perfect as
It has many large and deep drawers in it.
Which is wonderful for storing my material that I just love!
Having a space to inspire yourself and to be able to create is wonderful!

I have been filling it with so many treasures,
See my cute little antique bunny?

See my little rose covered table,
This is just a folding table,
Which I covered with an old vintage rose sheet,
 I found at our Goodwill Store.
I now have my jewelry, making things on this table.

I love these miniature glass slippers!
And Angel watches over me...

I only have a small twin bed in this room,
 Because I wanted the extra space for creating.
 And more room for my Treasures...


Threads of every color!


Found this large picture at Hobby Lobby!


I made a cute little chair cushion for this chair,
I use it for my sewing machine table.

It turned out really cute!
It has a big bow on the back to keep the cushion on!


See my sweet little strawberry pin cushion?


A few more little pink flower pictures!


This one has always been a very favorite of mine!

Well, thanks for the visit; I have enjoyed sharing my creative space with you!
Looking forward to painting this room, and putting in new carpet, one day.
But, I have been taking one room at a time and giving it a makeover.
Have a wonderful and creative season...

Blessings,
Roxy

Tuesday, October 8, 2013

Our Bedroom Makeover

 Here is a picture of my old drapes.
Ten years ago I really liked them!
They were a very pretty pattern and very thick material.
I always have to line my drapes becaus my Hubby works nights.
I already had taken down all the pictures, when I thought,
take some before and after pictures for my blog. 


 This room has very tall ceilings.
Two long walls and of course to short walls.
Which means only two walls to work with for a big bed and dresser.
There is only plan A for moving the furniture around.


 Okay You all can gasp...
I had a pink wall,
HAD a pink wall!
Pepto Bismal anyone?
(Really I liked it!)


 Teal carpet...
OKAY
It was in style 20 years ago!
(I really liked it too!)
 
 
Now the after:


 We painted it a very pretty warm golden color.
It made the room so cozy!
It made it so calming and peaceful for us.


 Notice the lush thick beige carpet!
God is so amazing,
 we found this in the back of a carpet store.
It was on one of those big rolls way in the back.
I was praying Lord, help me find a treasure.
This carpet went for $28.00 a yard!
We got it for $2.78 a yard!!
The man said to me lady you got expensive taste.
He said we quit selling carpet like this because people,
do not buy this expensive stuff anymore.
So, it was just waiting for me. 


 My new bedspread,
 pretty white with lovely flowers on it.


 My new curtains!
We spray painted our old lamps black,and
We  bought new lamp shades for them.


 Cutting out these curtains was very hard!
My dear friend Pam came out and helped me!
I could not of done it by myself, as the pattern in this thick
material had to line up just right.
We had three windows to cover in our room.
Thank You Pam!
I Praise God for you!!


 I was smoking hot on this machine!
I did so much sewing on this project my machine
needed a tune-up afterwards.


Amazing!!
All the designs in this print lined up perfect!
 
I am so blessed!
So, in another 20years will the beige carpet be out of style?
The salesman told me that this carpet was over 20 years old.
And God saved it just for me!
 
Blessings,
Roxy

Wednesday, July 31, 2013

The Charm Of Curtains...


Brass Candle Holders, Living From Glory To Glory Blog...
The Curtains Come Down
These curtains were some of my very favorites,
They made my living room so bright and cheery.

I loved the flowers with the distinctive vines and branch pattern.
But it was the bright yellow color I loved the most.

Rose Fabric, Living From Glory To Glory Blog...

I have always tried to put some yellow in every room as I think
It helps a room to pop (catch your eye).

But after I got my new furniture,
the flowers and yellow did not flow well together.

So I found a neutral earth color fabric of stripes.
By my own confessed love of flowers and vintage material
 this  was a really different choice for me.
But I have found this choice of stripes to go remarkably well in my living room.

But something was still missing;
I needed lace or something to say soft and charming
I found these perfect valances at JC Penny's
They were in the clearance return bin and I got them each
for under $4.00 dollars.


Lazy- Boy Brand Couch, Living From Glory To Glory Blog...


They even have little clear glass beads hanging on the hem of them.

I also have hung a very light sage green color sheer panel under each
  curtain. It has allowed it to soften and darken the room.
Easy on the eyes, but not too dark.

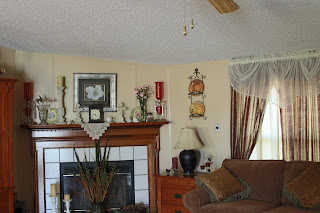
Living Room Mantel, Living From Glory To Glory Blog...

My daughter Amy found that very unique triangle shaped
lace doily on my mantel.
 I just loved it!

Making our homes distinctive and yet warm and inviting.
That is why it is called a living room.
Get it ?
We are to spend time in it really living;
Talking
Playing games
Working on a puzzle
Visiting with friends

Is your living room liveable?

Blessings,
 From My Home To Yours,
Roxy 


Thursday, January 17, 2013

Laundry Tips For Ladies Clothing


Laundry Room Before


This is my laundry room, it is functional, but plain and
very blah, and clunky.
I really don't mind washing clothes and doing our laundry.
But when it's not a sweet and tidy room,
and without color and decor.
It is just a plain laundry room!
After make-over

Painted and added new shelf
Painted chicken red, and added new sign.
See the Zote soap?
I also love the red and white  enamel tub.
See my enamel bowl  full of clothespins.


I was able to move right into the laundry room,
after we finished the kitchen remodel.
It was much easier and faster!

I think being able to refresh this room has helped me.
It was so plain jane.  Now it is really
clean and tidy.

I put up  pretty sage green  lace curtains over the windows,
and some pretty stripped green curtains over
our food pantry shelves.

Your clothes are an investment!
I believe it is important to take care of them.

A Few Laundry Tips:

If you want to keep your femine clothes nice,
always wash your things(skirts, pretty tops, sweaters etc.)
separate.

I also have started using only delicate laundry soap,
on my things.  As I have noticed so much fading
in my colors.

Place your under garments in a garment bag:
and wash your bras, but do not dry in the dryer!
Also, If you wear tights place them in a garment bag
to wash, but hang to dry.

And when you start a load, check water level
and pour soap in first.
Add fabric softener in  its dispenser with a bit of water.

Also, wash only your whites and lights together
and
your darks separate.

Do not dry your clothes overly dry!
As this is where shrinking comes in.

And some skirts you can just hang, as with some slacks,
to completely dry.
Hang all your skirts up and tops that you keep in
your closet. And fold all the others.

Iron as you need them, or pick a time that works for you.

Now, I know many of you have large families and
a never ending cycle of laundry.
But washing your clothes separate will pay off!

One wise women said:
Laundry never ends!

Blessings, Roxy

She select wool and flax and works with eager hands.
Proverbs 31:13


Copyright © living from glory to glory | Powered by Blogger
Design Customized With ❤️️ by My Fairy Blog Mother