Making Your Own Fabric Pumpkins
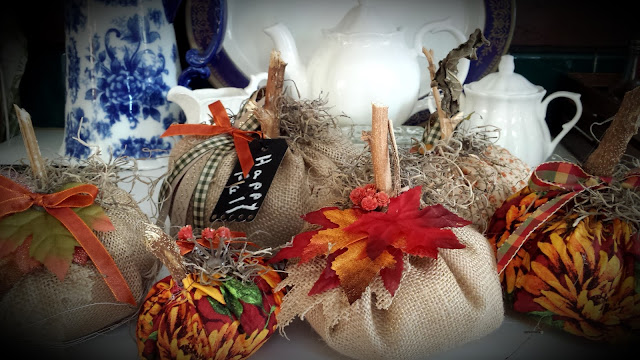
I really enjoyed making these fun fabric pumpkins,
You can make them in so many different sizes and different fabrics!
And You do not have to know how to sew : o)
Choose some fabric that has a fall or an autumn design or just considered fall colors,
Plain or with a pattern even the country style!
(You can even tea stain some material for this craft)
I traced on the back side of the material
3 different sizes of a circle's, small, medium and large.
The larger ones are a bit easier to work with!
I used my largest bowl and then a large plate and a smaller bowl.
You will need to use a needle and thread and go around the top of each pumpkin;
Do this gathering stitch just about 3/4 inch in so it pulls the gathering nicely.
Use a gathering stitch and also make sure you have a big enough knot
Once you have finished this, you will stuff the pumpkin with your
(Closing up the gap in the top can be a little bit harder,
But maybe you can have someone hold your pumpkin and close it up
You must make sure you do this well, do not be afraid to add as many stitches as
Find some wooden stems from your trees or an old sunflower stem
You will need to use your glue gun and apply enough glue to the end
Now press it down into the middle of your pumpkin.
Items Needed For This Craft
Fabric of your choice
Choice of a stem for your Pumpkin
Glue Gun and glue sticks
Ribbon
Moss, grass for covering the top of the pumpkins
Needle and thread
A bag of Polyester Fiberfill for crafts
Any other embellishments you like;
Fall leaves (I bought mine from the dollar Store)
Buttons
Ribbons
Also, we found very tiny chalkboard signs we attached to some
This really has been a super easy and fun craft!
One of the ladies that I had over to make these told me that
I did use some burlap material, but I also had to use embroidery thread
And an embroidery needle to sew the gathering stitch for this one.
The burlap was stiff and was harder to work with.
But the burlap I chose had some specks of gold in it and was really pretty!
You can make them as large or as small as you like;
Tip: Always use a popsicle stick to push the ribbons and moss on your
Pumpkins, so you do not burn your fingers!!
~Use Your Imagination and create a lovely fall ambiance in your home~


They look terrific. I need to do some fall crafting. I bought an orange t-shirt at a thrift store for a quarter. I plan to make some pumpkins with it.
ReplyDeleteDid you make these Roxy? Love them! Beautifully handmade! Happy fall love!
ReplyDeleteOh these are so delightful Roxy! A perfect little craft that produces so much joy, and being able to decorate for the fall weather with something you made is a wonderful inspiration! Hugs to you today dear friend!
ReplyDeleteRoxy, Your pumpkins look lovely! I made some a few years ago and they are fun to decorate with. Thanks for sharing at Home Sweet Home!
ReplyDeleteI love how your pumpkins came out! :)
ReplyDeleteI cut my circles too small, and I've not finished the pumpkins. I need to either do it or discard them!
ReplyDeleteBe blessed,
Laura
Good morning! Just a little note to let you know that this post has been *FEATURED* today on the Art of Home-Making Mondays (at Strangers & Pilgrims on Earth) on our special pumpkin edition. Thank you for sharing with us! :)
ReplyDeleteHello, I read your new stuff daily. Your writing style is witty, keep it up!
ReplyDeletePretty! This has been a really wonderful post. Thanks
ReplyDeletefor supplying this info.
Appreciate the recommendation. Will try it out.
ReplyDelete